Tutorial 3A: MRM workflow for document-based RAG systems
Overview
Organizations are increasingly deploying document-based RAG systems to answer domain-specific questions. These systems are common in banking, healthcare, law, telecom, and government, where they interpret regulatory and compliance documents such as legal acts, manuals, or policies.
However, RAG systems introduce risks such as,
- Hallucinations: answers not grounded in the source text
- Leakage of sensitive or personally identifiable information (PII) from unredacted documents
- Adversarial or misleading prompts that trick the system
- Bias and fairness issues in responses
- Lack of robustness to typos or poorly phrased questions
The Model Risk Management (MRM) workflow in H2O Eval Studio is a structured process to evaluate, validate, and improve RAG systems that consists of 9 steps. It helps ensure that answers are reliable, compliant, safe, and auditable.
In this tutorial, we explore each step of the MRM workflow in a generic way, using the Banking Act as an example.
Objectives
By the end of this tutorial, you will be able to:
- Understand the purpose and scope of the H2O Eval Studio's MRM workflow for RAG.
- Generate topics, questions, and expected answers for evaluation.
- Apply automated and human-in-the-loop evaluations.
- Detect weaknesses such as hallucinations, leakage, and adversarial sensitivity.
- Use MRM workflow outputs (reports, guardrails) to improve your RAG system.
Prerequisites
To follow this tutorial, you’ll need:
- The Banking Act document.
- Access to H2O Eval Studio.
- Basic understanding of RAG, LLMs and evaluation metrics
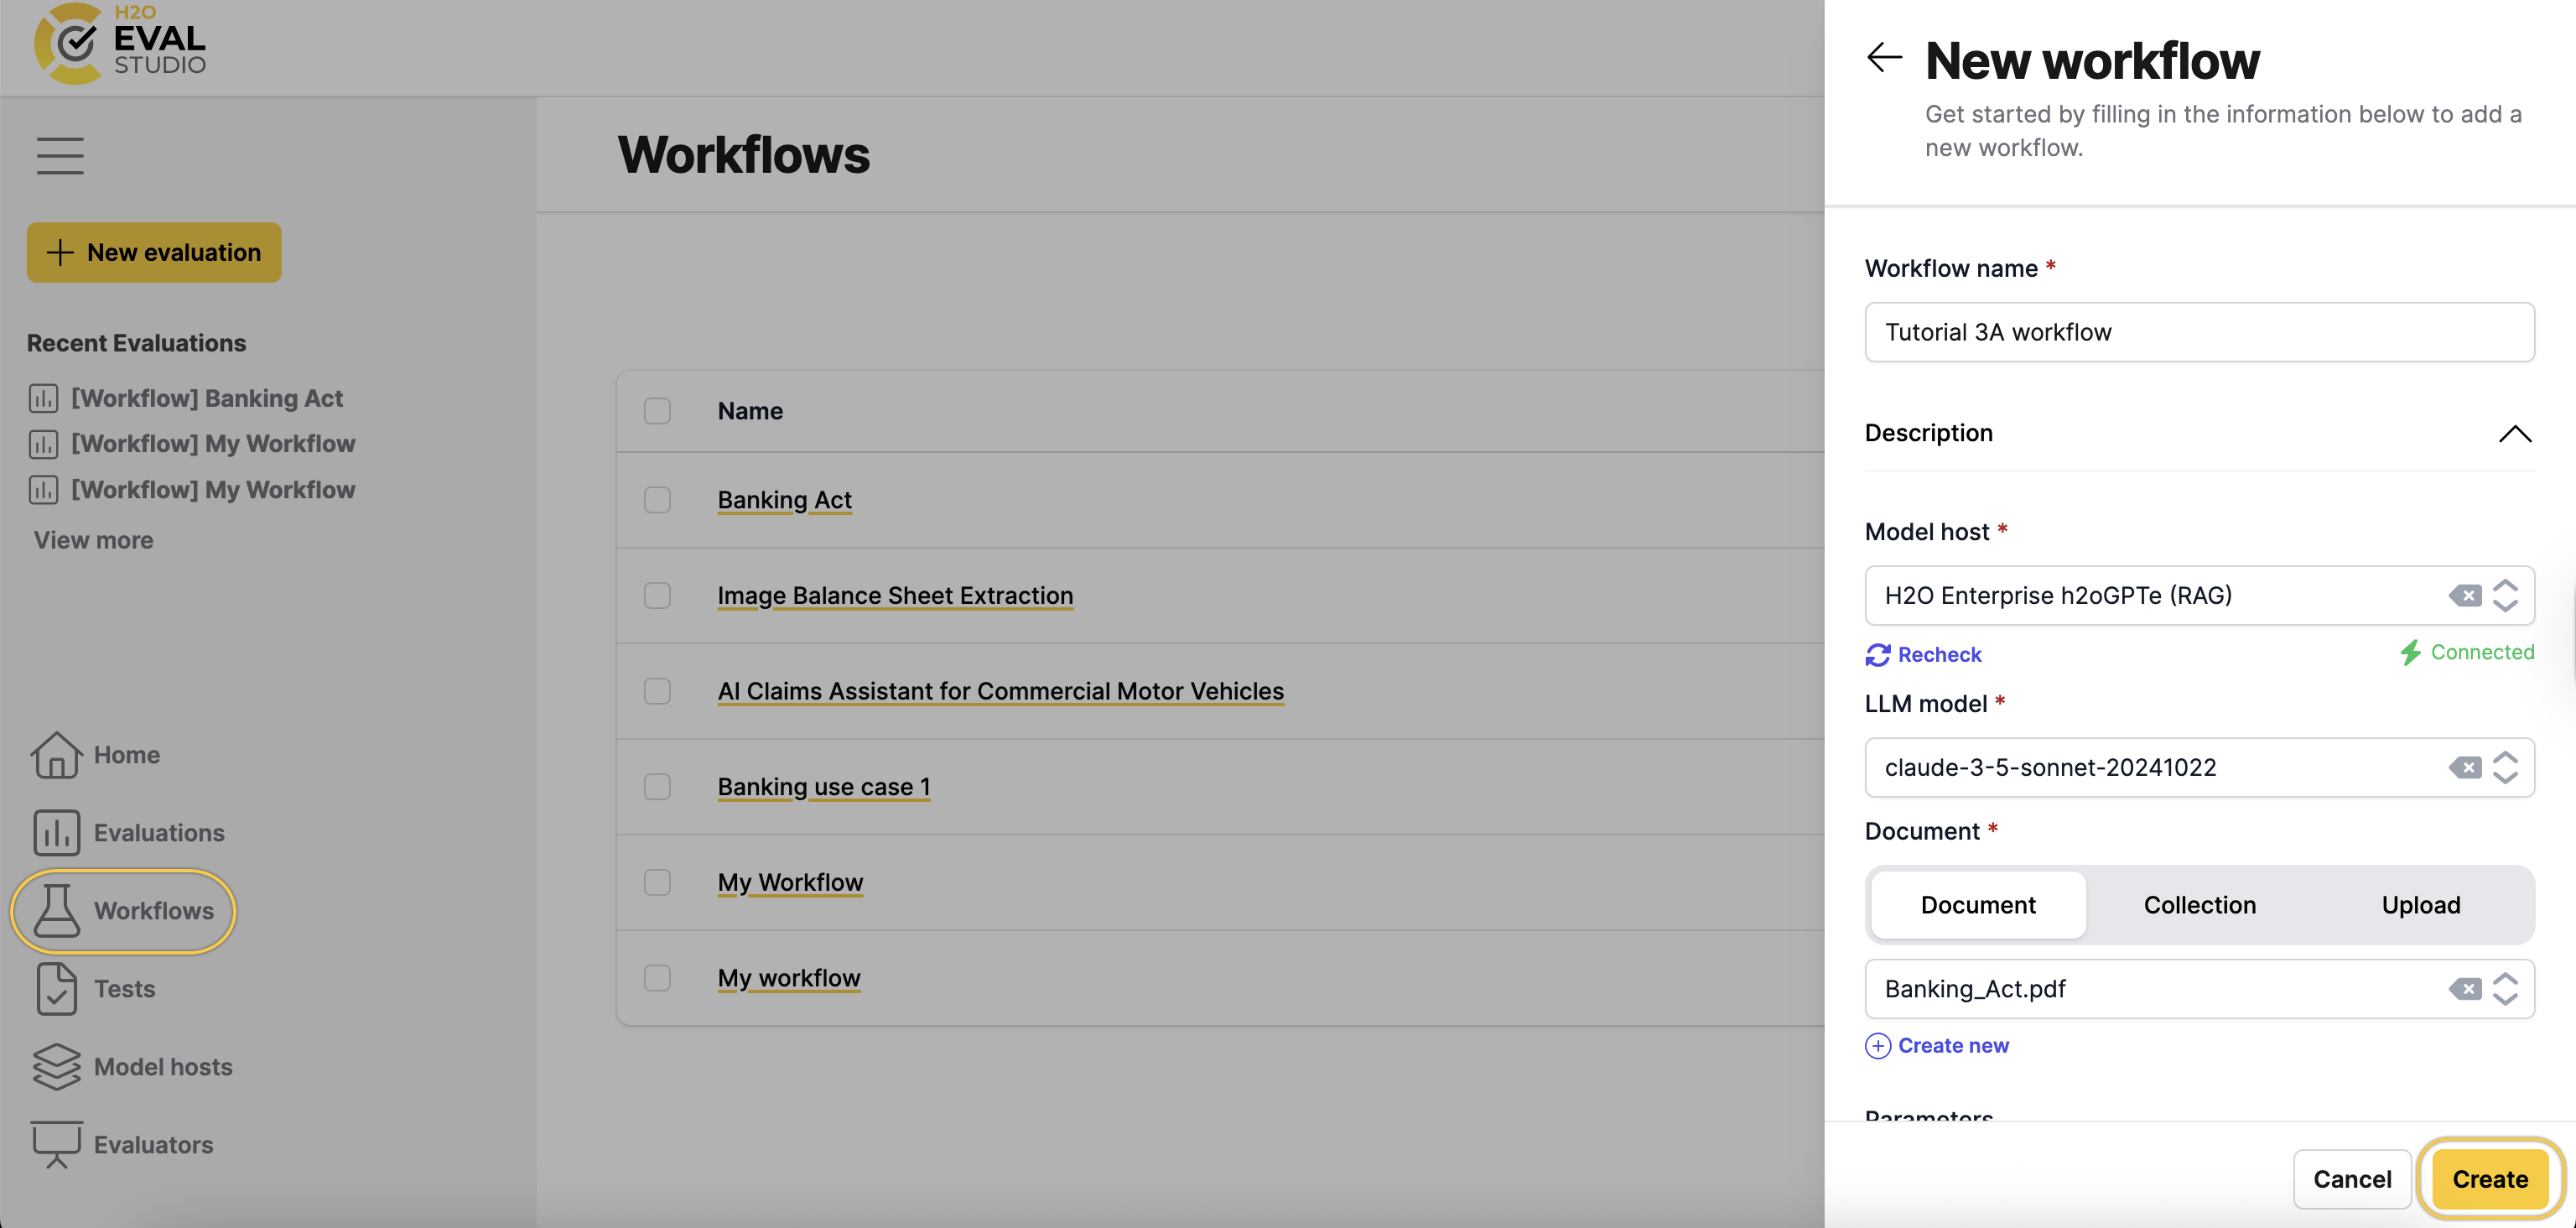
Step 1: Create a new workflow
Next, let's create a new MRM workflow for the banking act corpus.
- Click Workflows in the left navigation bar.
- Click New workflow.
- In the Workflow name box, enter:
Tutorial 3A workflow - From the Model host drop-down menu, select
H2O Enterprise h2oGPTe (RAG). - From the LLM model drop-down menu, select
claude-3-5-sonnet-20241022. - From the Document section, upload
Banking_Act.pdfdocument as the RAG corpus. - Click Create.
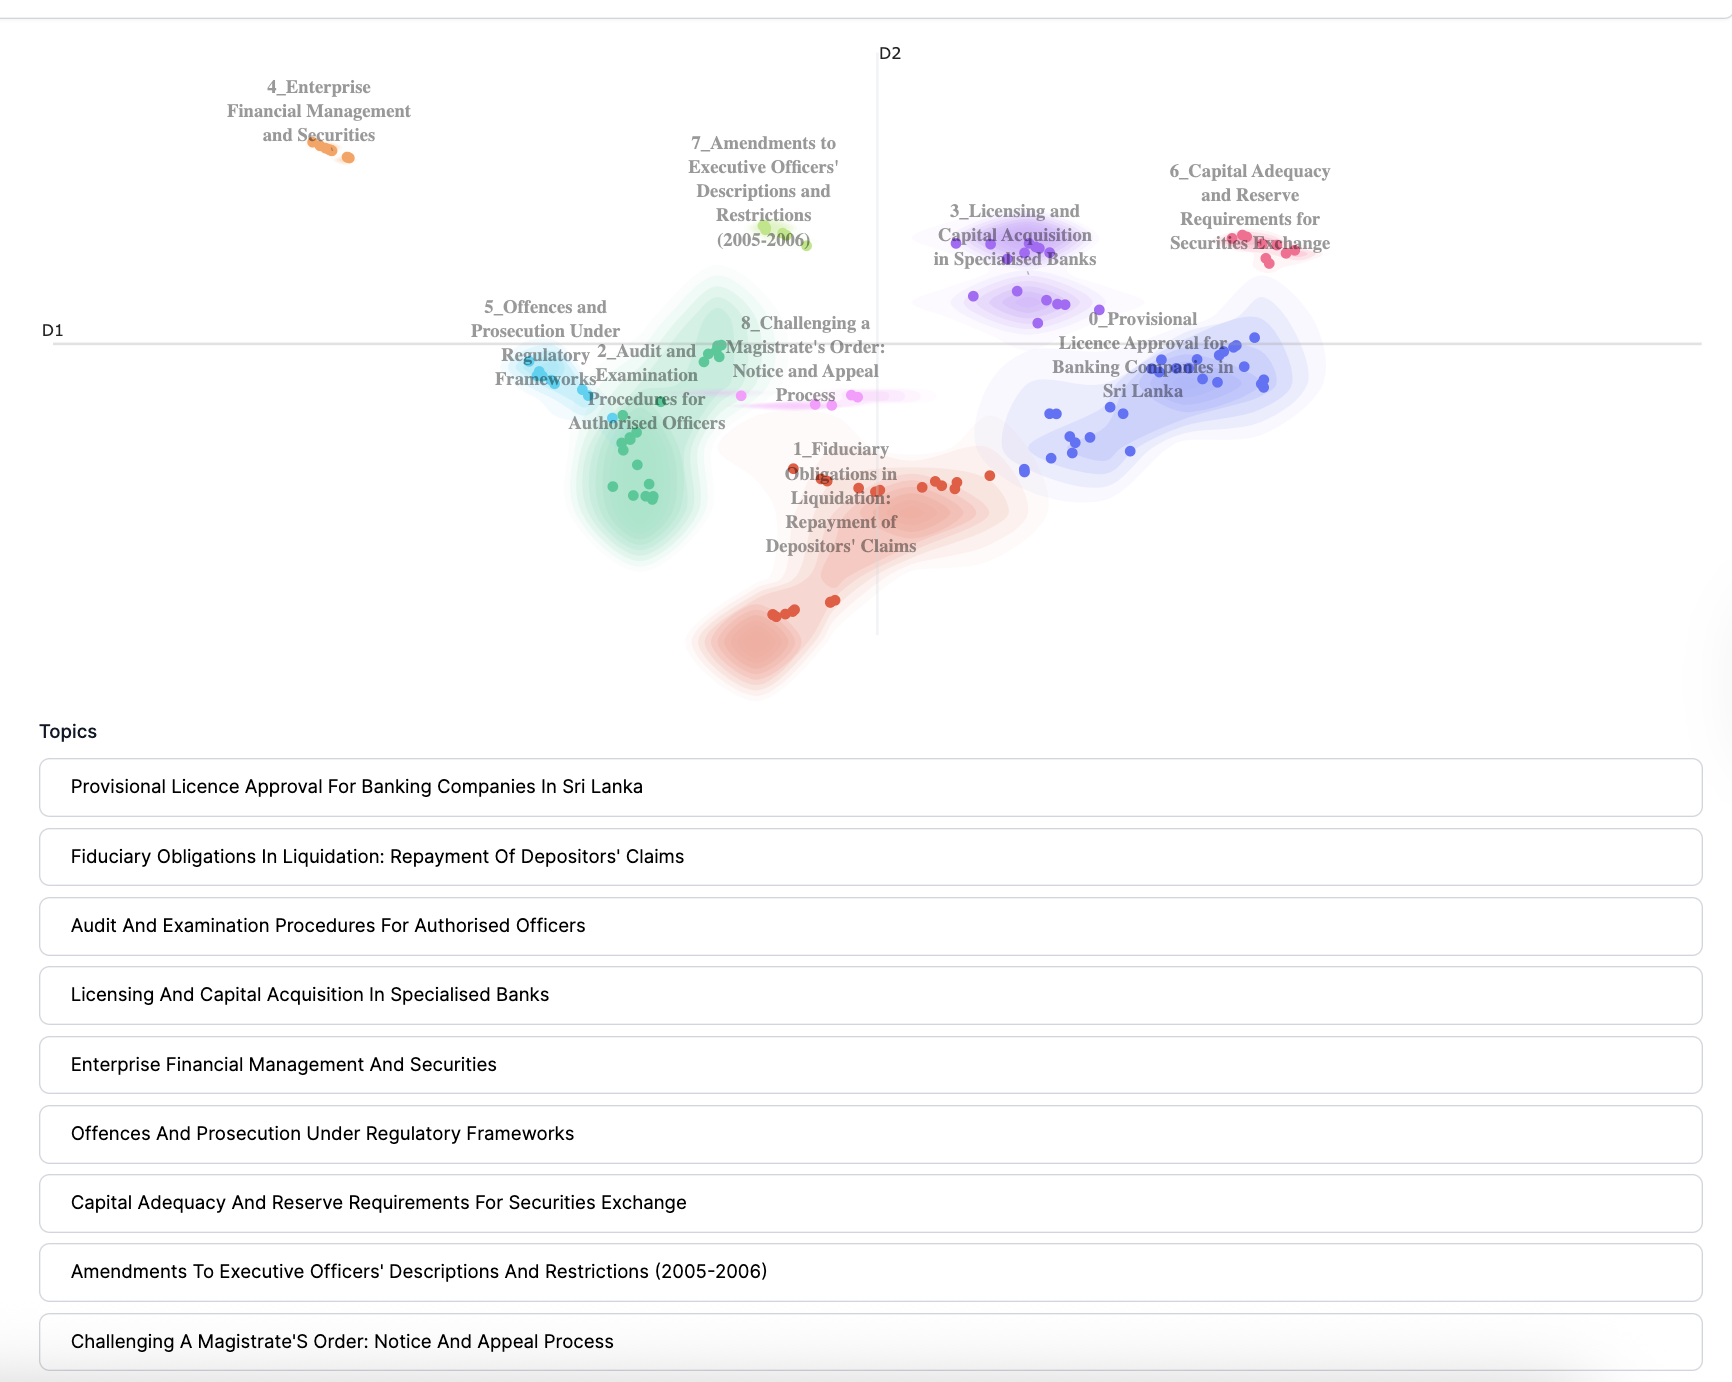
Step 2: Topic modelling
In this step, H2O Eval Studio automatically extracts chunks from the workflow document, clusters them, and generates relevant topics in the RAG corpus.
To run the topic modeling step:
- On the Tutorial 3A workflow page, click Topic modeling.
- Review the configuration settings. Keep the default values.
- Click Run.
After the topic modeling step completes, you see the generated topics and a heatmap showing the spread of each topic.
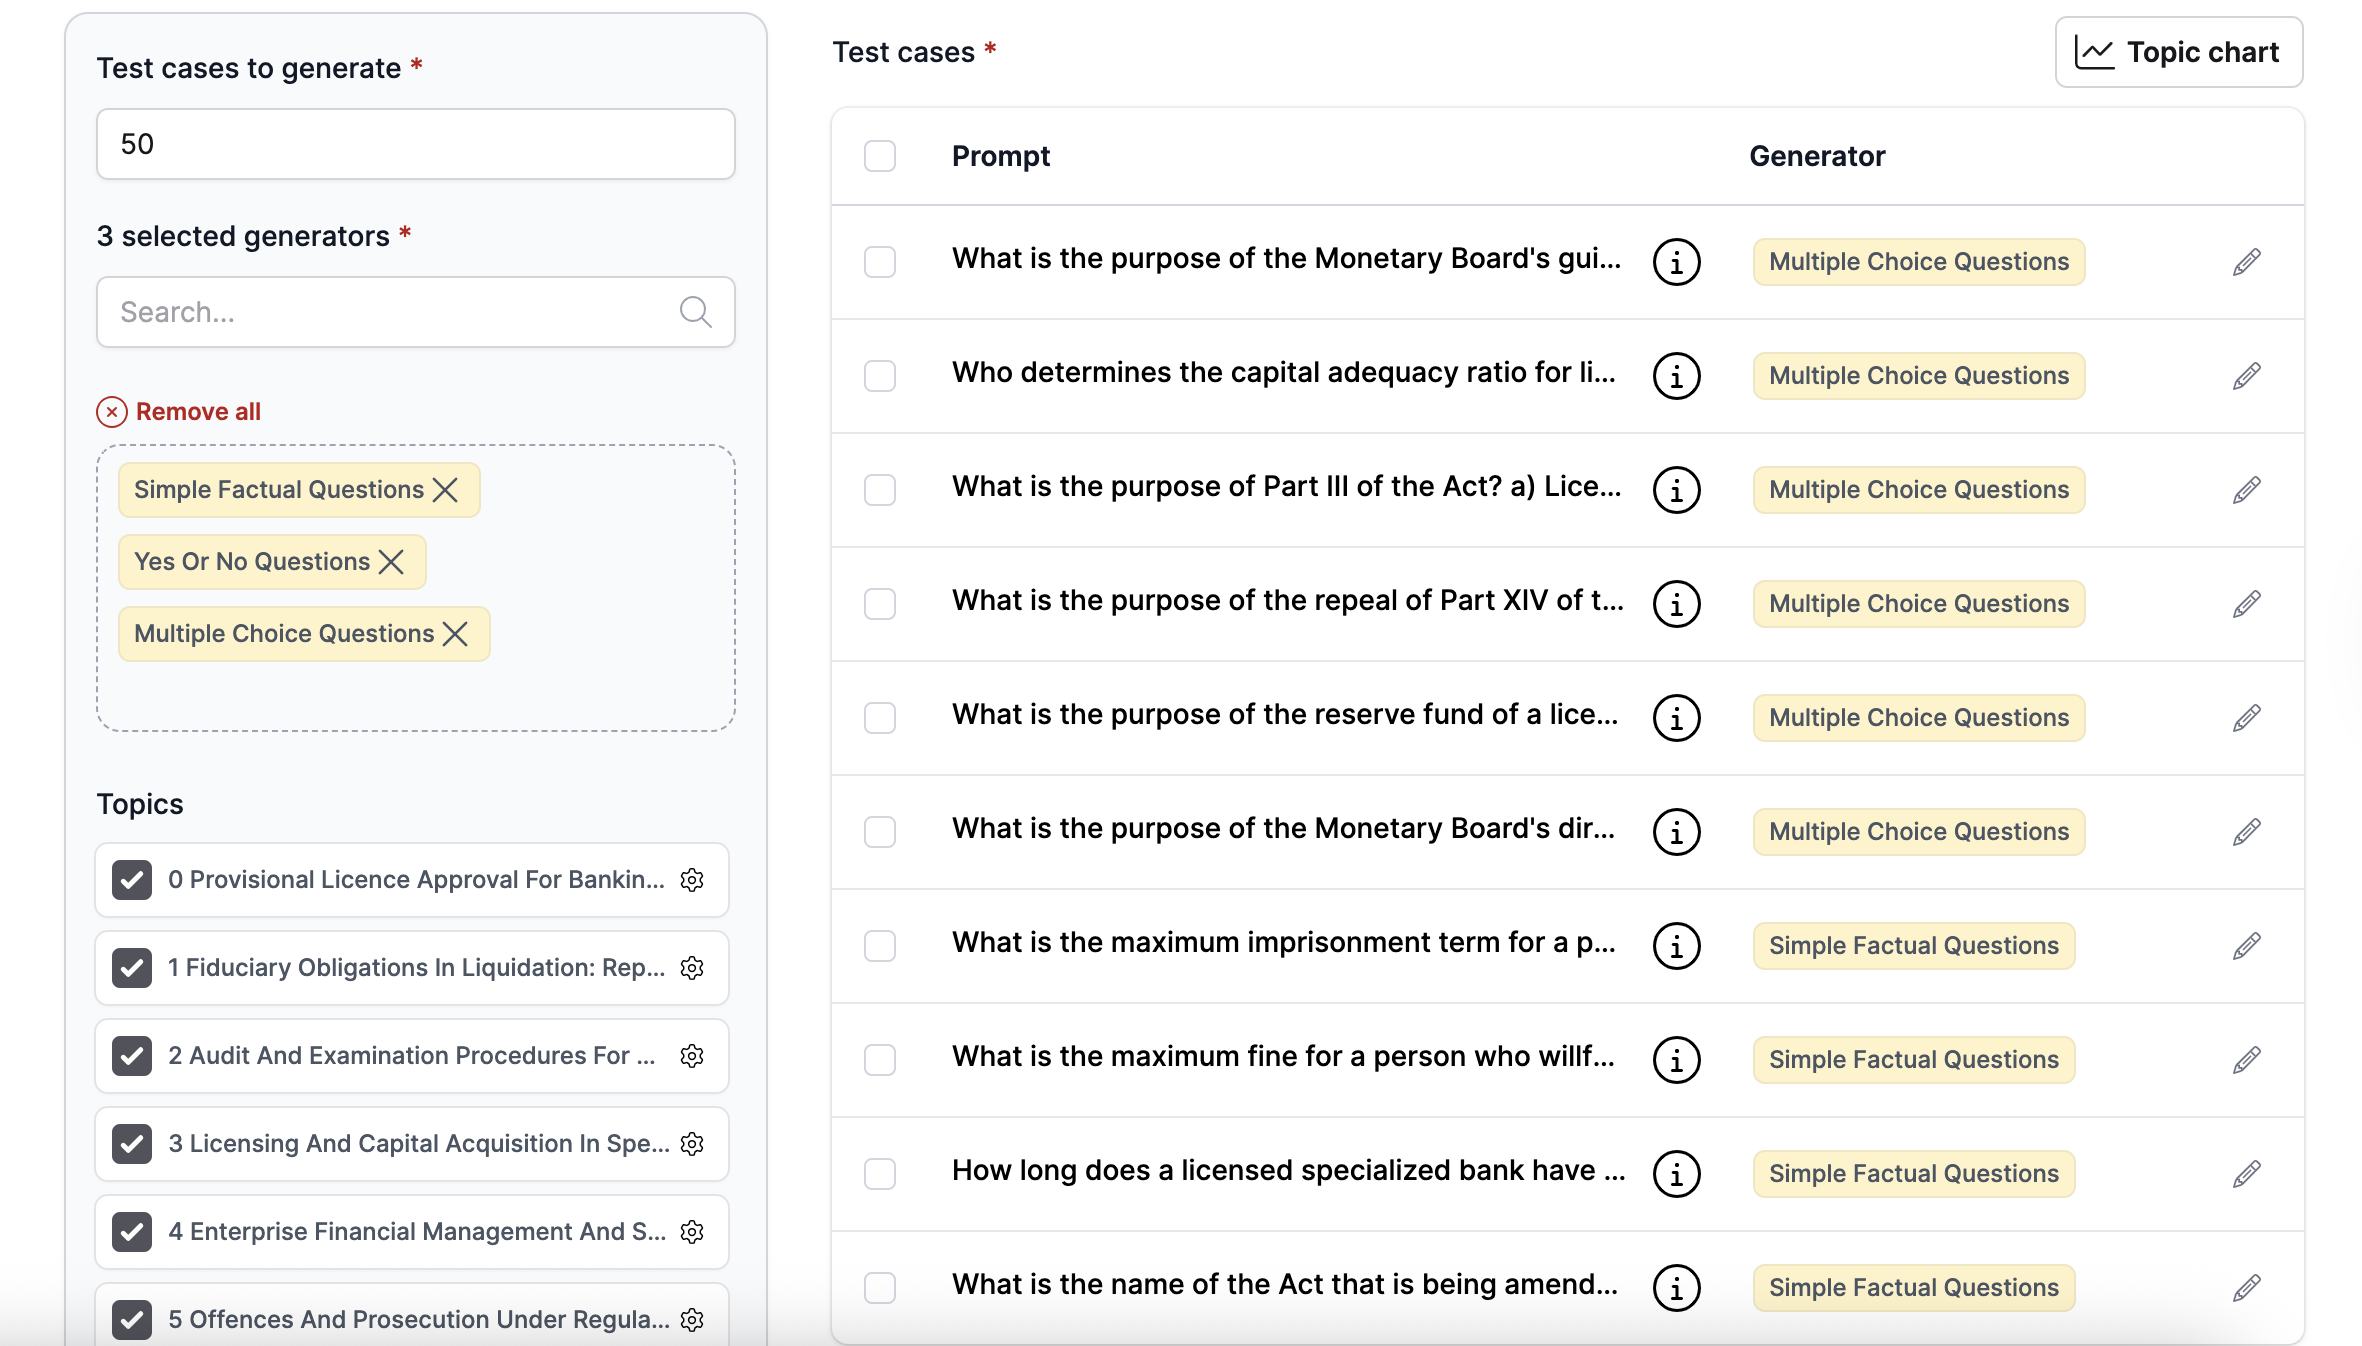
Step 3: Test generation
In this step, question-and-answer pairs (test cases) are generated from the corpus-based topics used by the Banking Act RAG. RAG is tested on actual data rather than generic or out-of-scope questions and answers.
The system uses more than 10 question-and-answer generators covering different types of questions to identify potential RAG weaknesses. It generates a variety of relevant corpus-based test cases, helping you identify prompts or topics where the RAG performs poorly.
To run the test generation step:
- Click Next step or Test Generation.
- Keep the default number of test cases to generate.
- Keep the default selected generators, and additionally select Multiple Choice Questions.
- Keep the default number of topics.
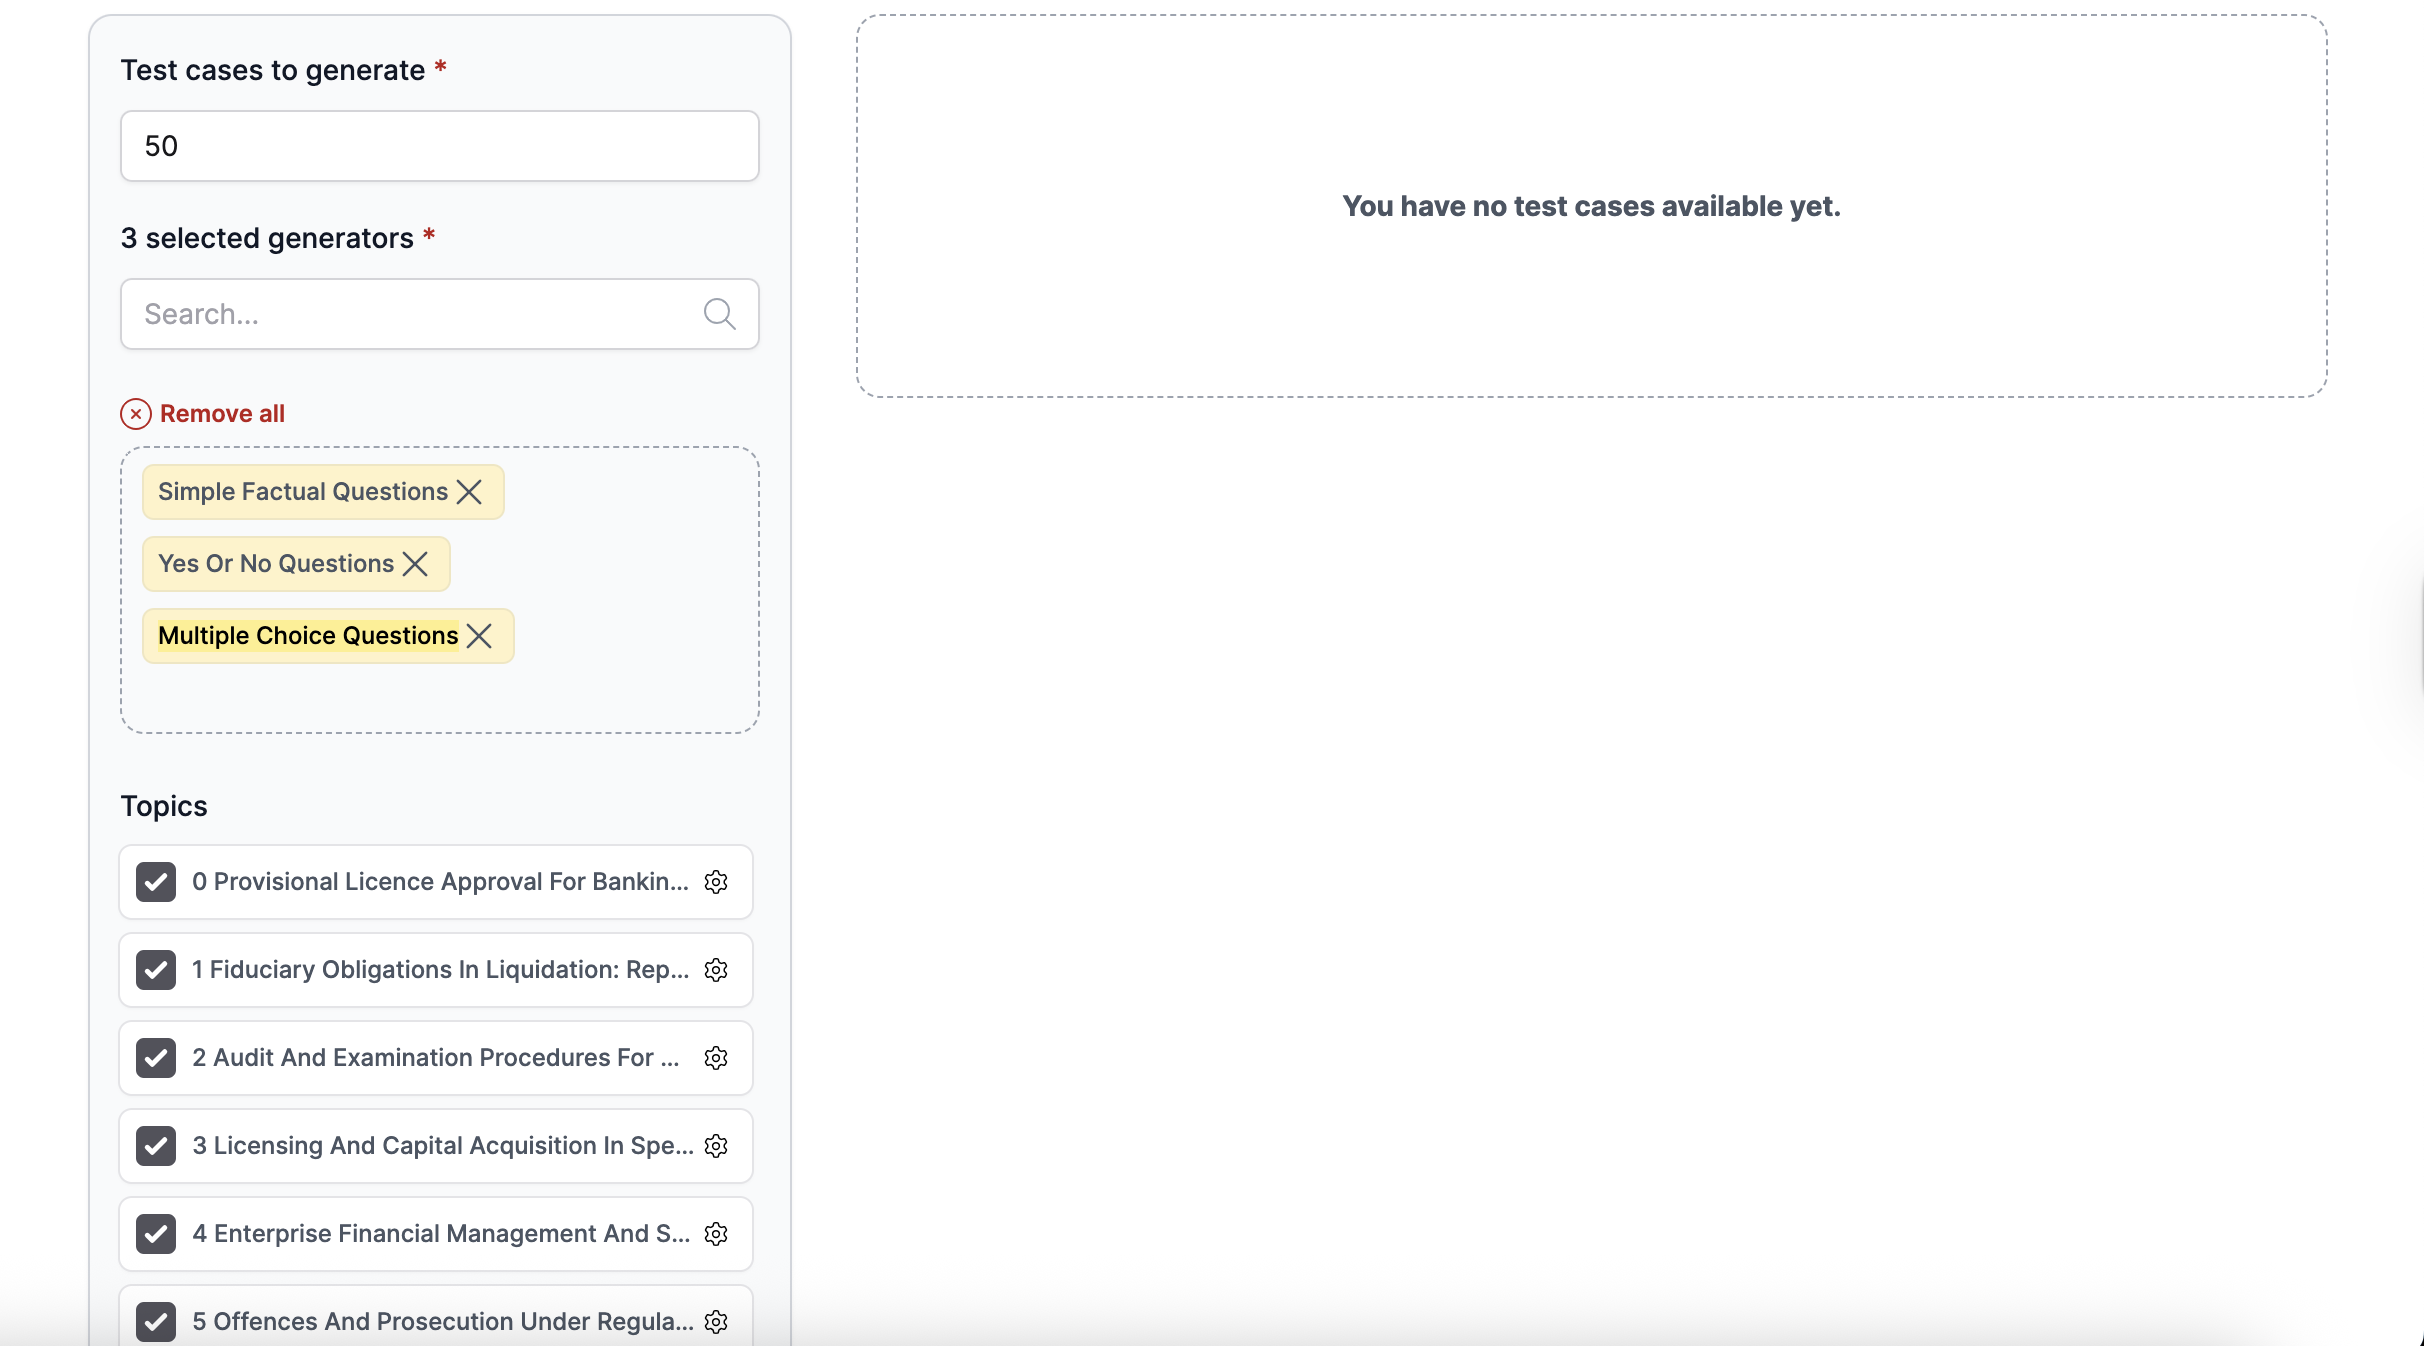
- Click Run.
After the test generation step completes, you see the generated test cases with their generator type. You can edit test case details, such as the prompt and expected answer.
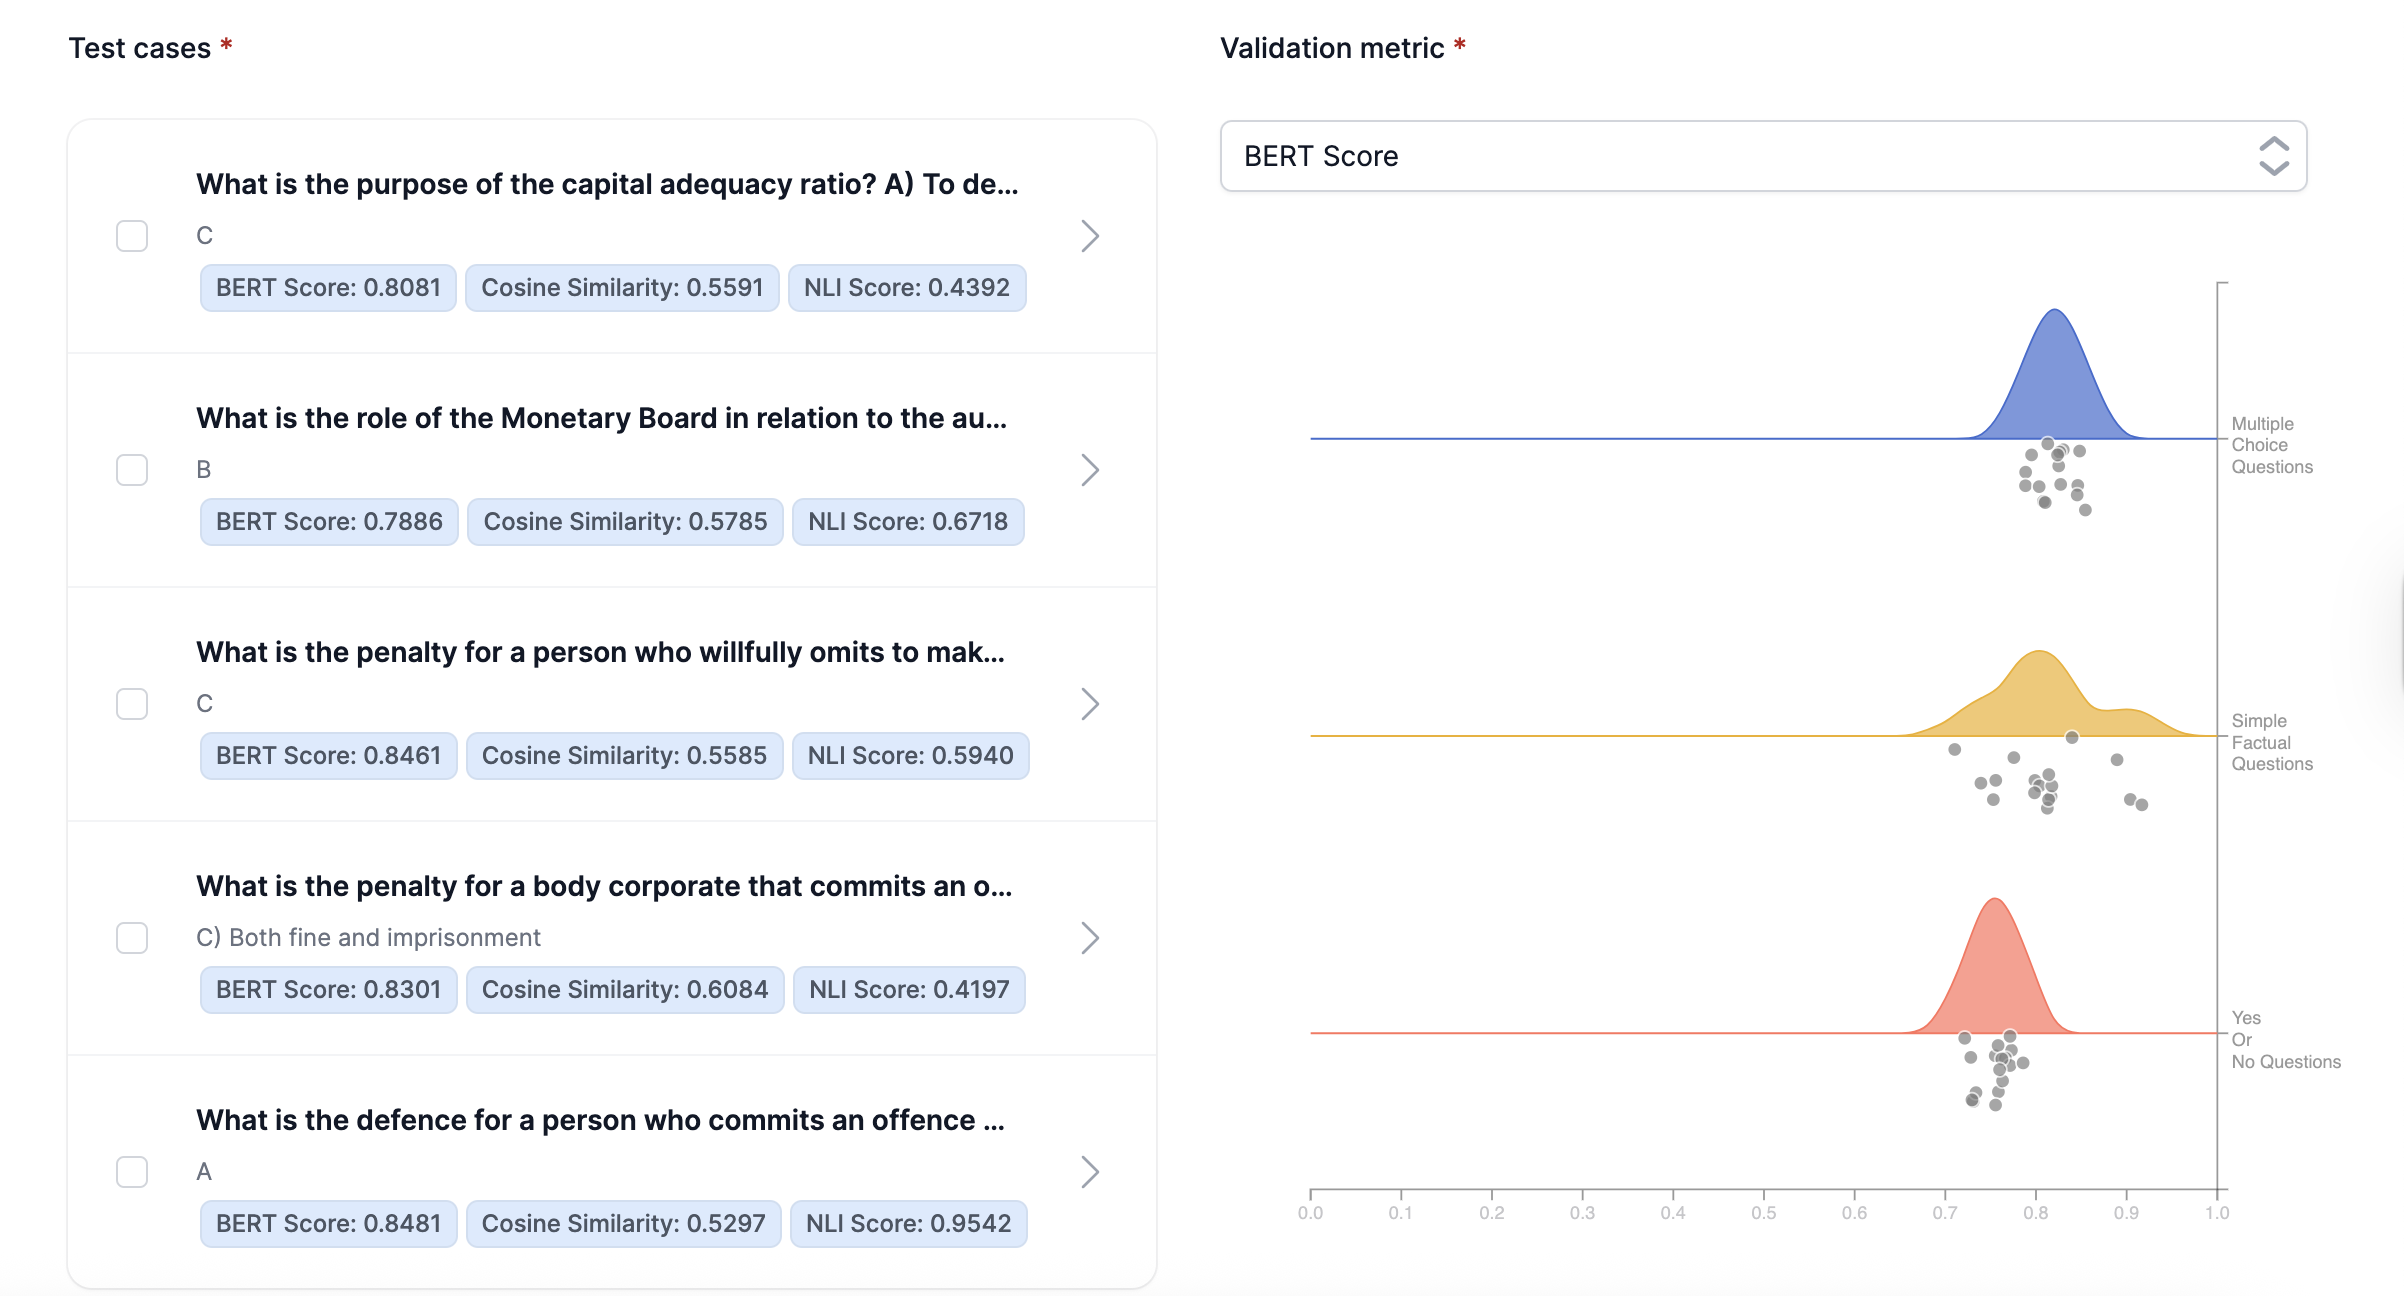
Step 4: Generated test validation
This step validates the generated test suite using metrics such as cosine similarity with the original text, BERT score, or NLI score. It helps you assess test quality and iteratively improve model validation.
To run the generated test validation step:
- Click Next step or Generated Test Validation.
- Optionally select test cases to delete. For this tutorial, keep all test cases.
- Click Run.
After the generated test validation step completes, you see the cosine similarity, BERT score, and NLI score for each test case, along with visualizations for each metric.
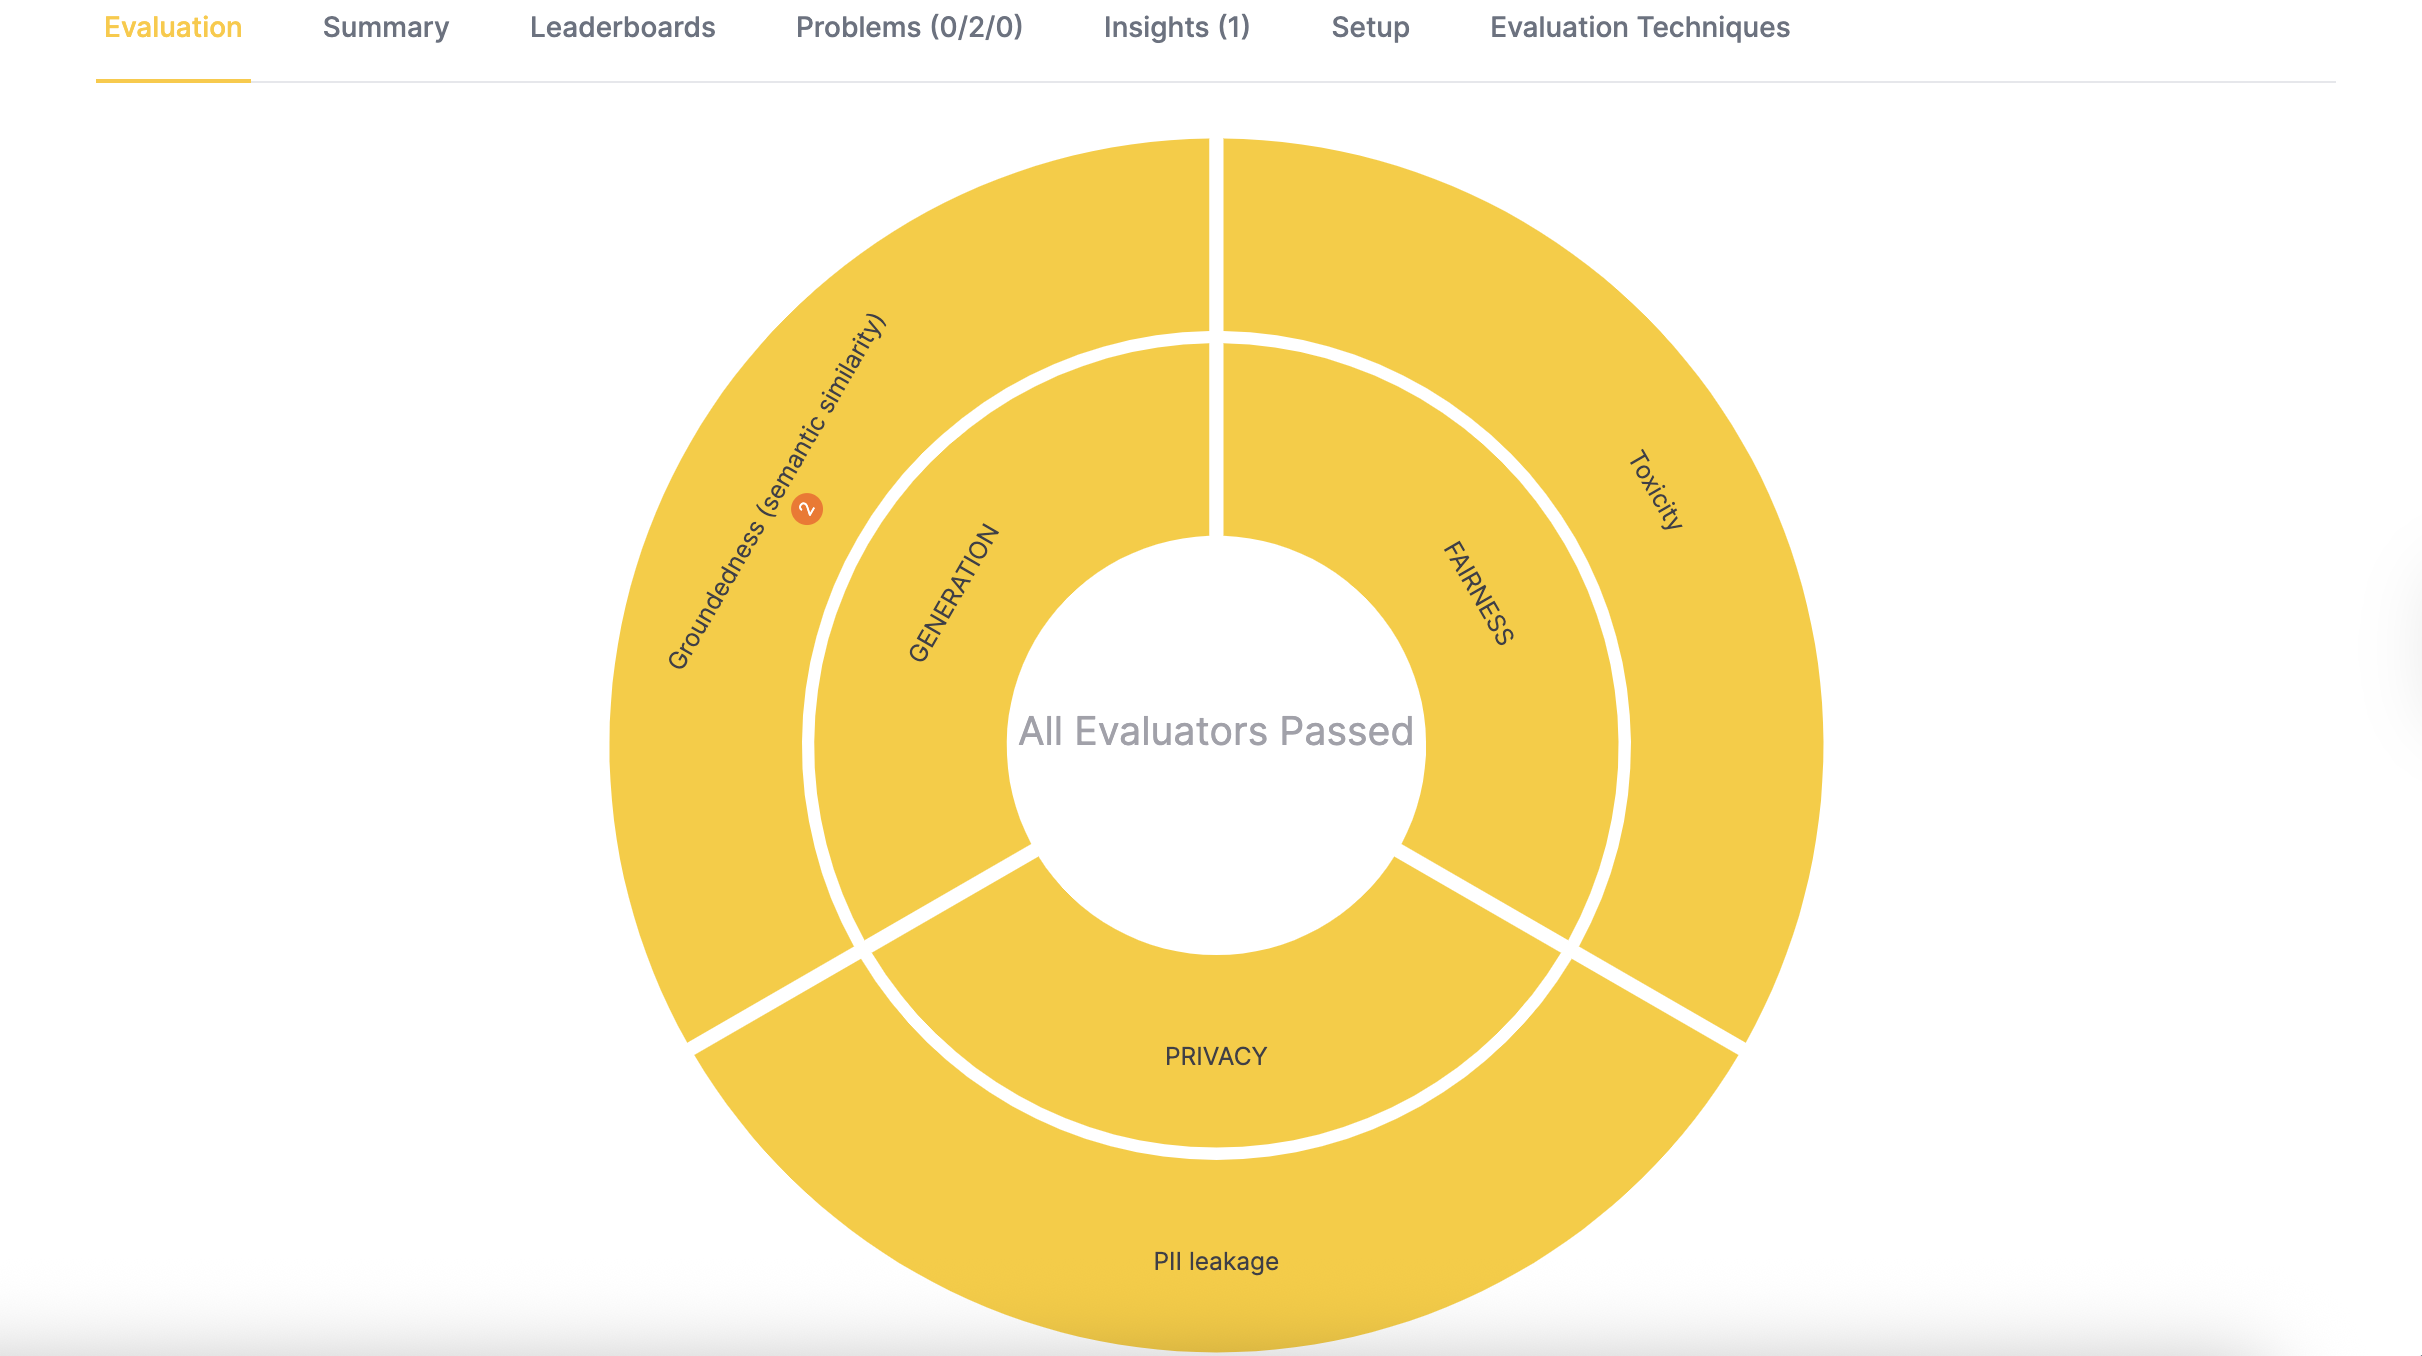
Step 5: Automated evaluation
This step evaluates the performance of your RAG system using techniques such as semantic similarity, answer correctness, and context relevancy. After the evaluation completes, you can view the results and insights in the dashboard.
To run the automated evaluation step:
- Click Next step or Automated Evaluation.
- Add the following evaluators: Groundedness, PII leakage, and Toxicity.
- Click Run.
You can view visualizations, summaries, insights, and other details in the evaluation dashboard.
Step 6: Human evaluation calibration
In this step, a human reviewer labels a random sample of responses to confirm whether they truly passed or failed against the metric score thresholds. The workflow then uses these labels to automatically calibrate the evaluation configuration and improve the accuracy of the results.
To run the human evaluation calibration step:
- Click Next step or Human Evaluation Calibration.
- Review the evaluation results for each test case. Confirm or correct the system’s pass/fail labels.
- Mark any responses you want to fail by clicking Failed.
- Click Run.
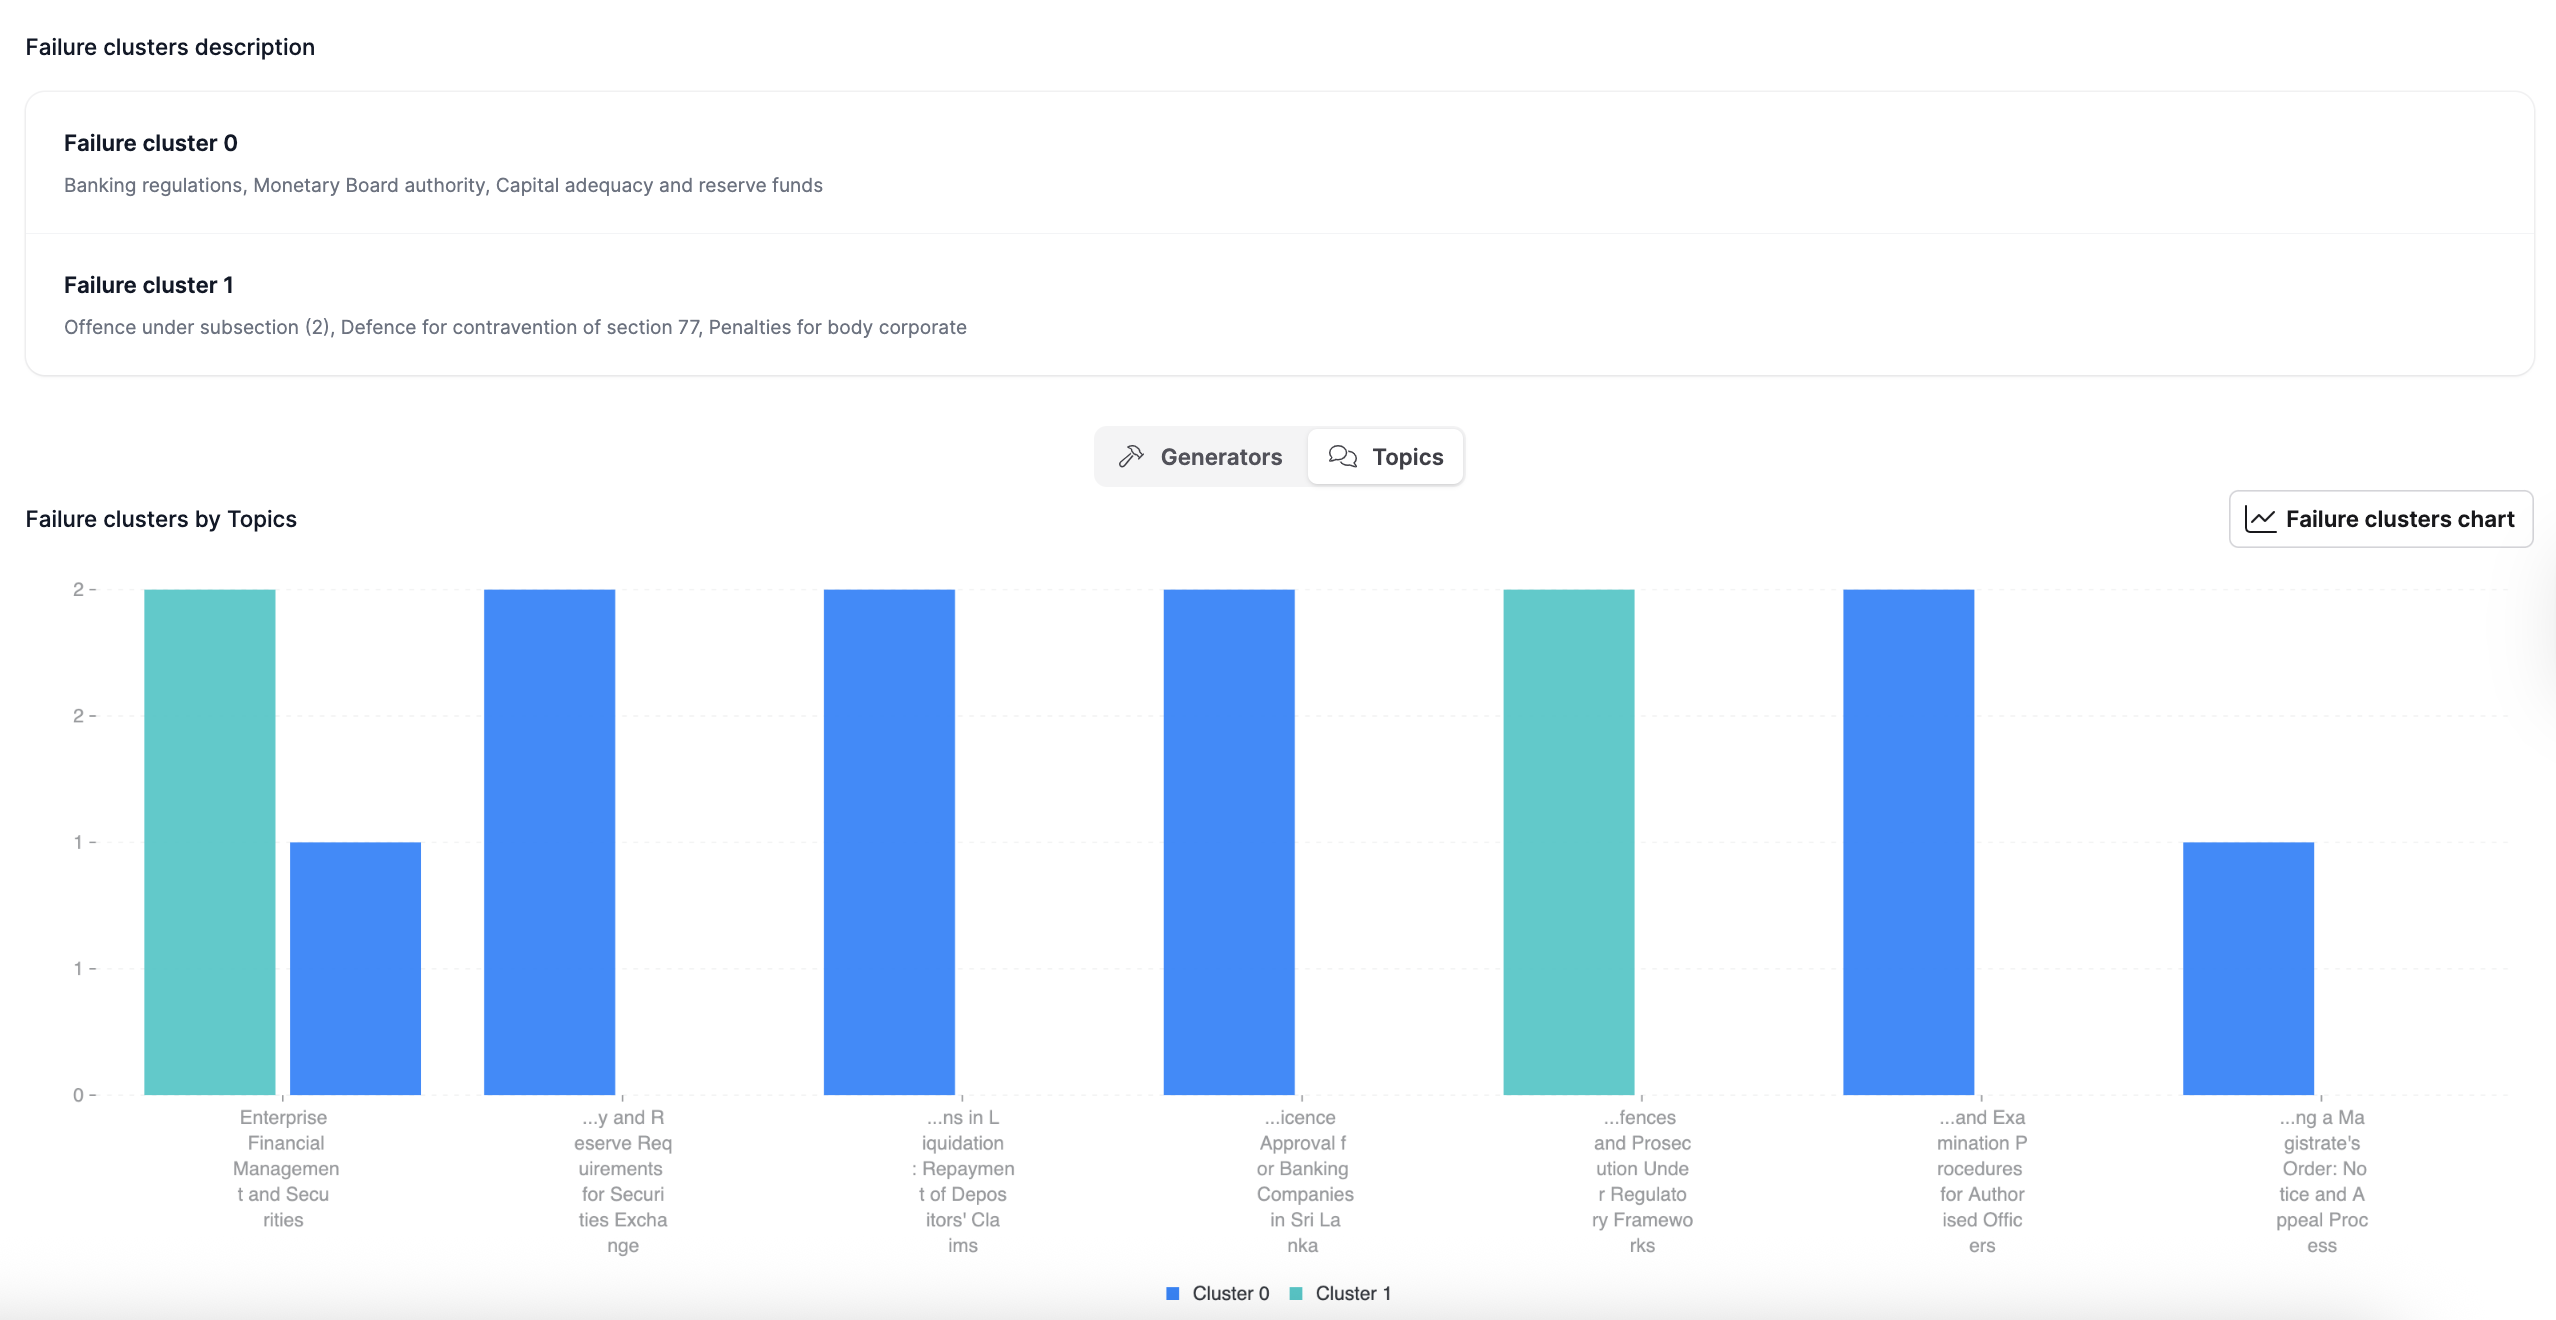
Step 7: Failure clustering
In this step, the workflow clusters failed test case evaluations to identify common failure patterns or root causes. It also provides a description and frequency of test case groups that share a common source of failure.
To run the failure clustering step:
- Click Next step or Failure clustering.
- Click Run.
The clustering process examines dimensions such as topics, generators, and failure characteristics to reveal patterns that might not be obvious. This analysis helps prioritize debugging and guides targeted improvements to system performance.
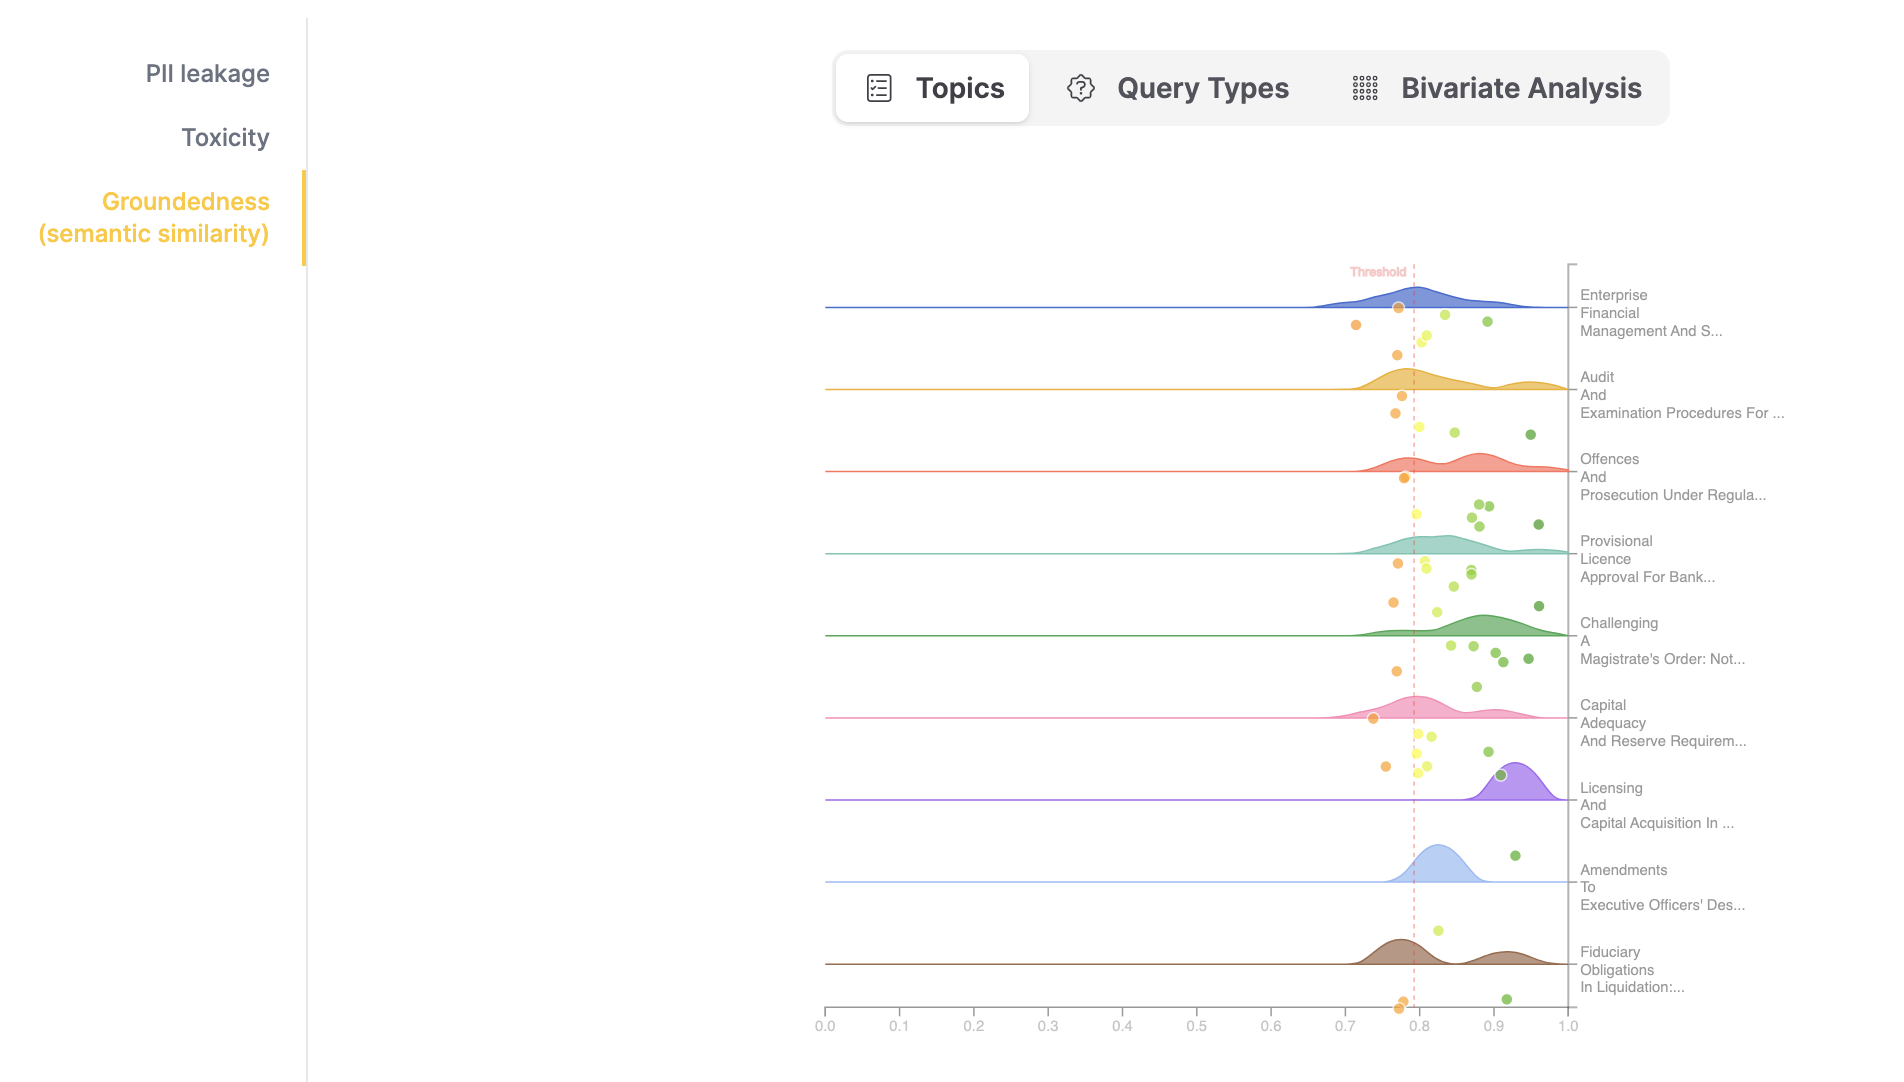
Step 8: Weakness detection
This step uses metric scores from the evaluation to detect the topics or test case types where RAG performance is suboptimal.
The system provides three types of weakness visualizations:
- Topics: Distribution of metric scores per topic.
- Query types: Distribution of metric scores per query type.
- Bivariate analysis: A grid showing test case scores by generator (rows) and topic (columns). Each dot represents a test case, and its color indicates the score. Dot size has no specific meaning.
To run the weakness detection step:
- Click Next step or Weakness detection.
- Click Run.
The visualization shows a grid where each cell represents a combination of a topic and a query type. Color intensity indicates the average score of responses in that combination. Dots represent individual test cases and are colored by score.
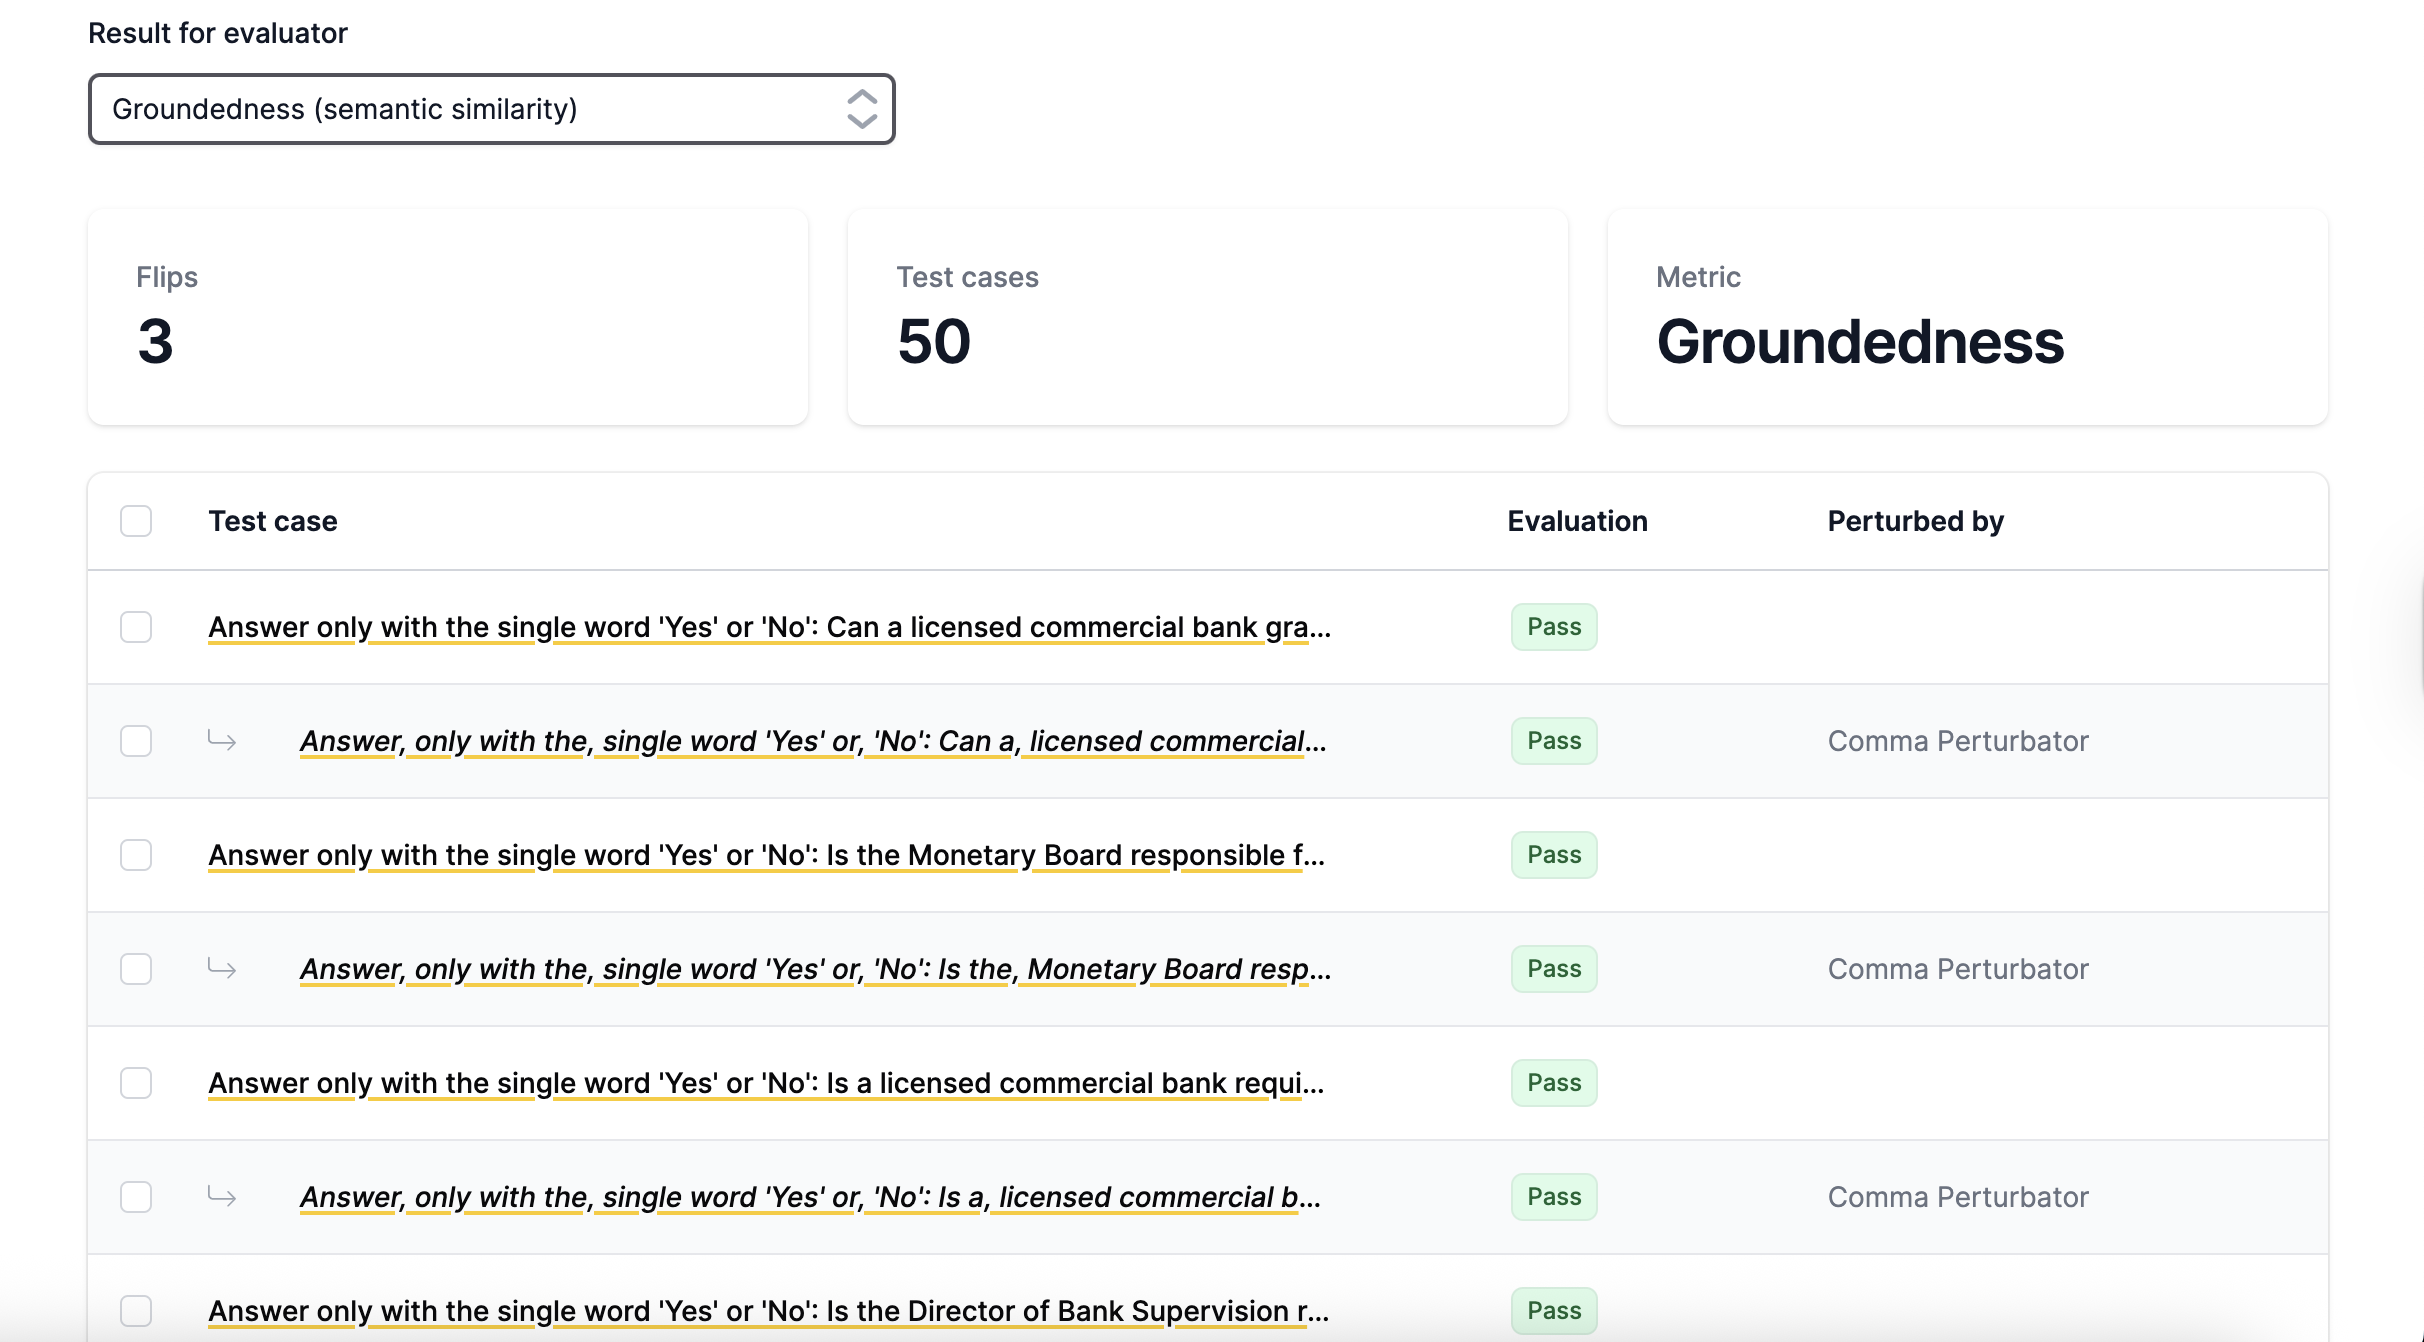
Step 9: Robustness Testing: Input Variations
This step checks whether changes to user questions (such as word reordering, typos, or punctuation differences) affect RAG performance. RAG should handle syntactically or grammatically incorrect inputs. The workflow includes more than 10 perturbation methods.
To run the input variations robustness testing step:
- Click Next step or Robustness Testing: Input Variations.
- Select all test cases in the table.
- Keep the default perturbation method and intensity.
- Click Perturb.
- Click Run.
The results show flips, cases where perturbations cause evaluation scores to cross the threshold (changing from pass to fail or fail to pass). Each flip indicates that the model is sensitive to that type of perturbation and provides insights into its resilience against input variations.
Step 10: Robustness Testing: Adversarial Inputs
This step checks whether the distribution of metric scores for adversarial prompts (such as intentionally misleading questions) differs from the distribution of scores for test cases generated in the test generation step. The workflow includes three adversarial input generator types.
To run the adversarial inputs robustness testing step:
- Click Next step or Robustness testing: Adversarial inputs.
- Keep the default values for Adversarial test case count, Adversarial input generator types, and Topics.
- Click Run.
Summary
You have now completed all nine steps of the MRM workflow in H2O Eval Studio.
By running this workflow, you:
- Evaluated your RAG system on domain-specific data.
- Applied both automated and human-in-the-loop evaluations to improve accuracy.
- Identified weaknesses such as hallucinations, leakage, and adversarial sensitivity.
- Tested robustness against input variations and adversarial prompts.
At the end of the workflow, you can:
- View a summary of the evaluation results.
- Review a detailed workflow report with findings.
- Upload corpus patch document with "difficult to answer" prompts to improve RAG performance - the document is available only if such prompts were identified.
- Extend RAG collection system prompt with rules provided by the system prompt extension to make RAG more robust - the extension is available only if the problems which can be fixed with system prompt rules are found.
- Export a guardrail configuration that helps enforce safe and reliable RAG system behavior.
For more information, see View workflow.
These outputs allow you to document system performance, meet compliance requirements, act to mitigate identified problems, and establish guardrails for ongoing monitoring and improvement of your RAG applications.
- Submit and view feedback for this page
- Send feedback about H2O Eval Studio to cloud-feedback@h2o.ai